
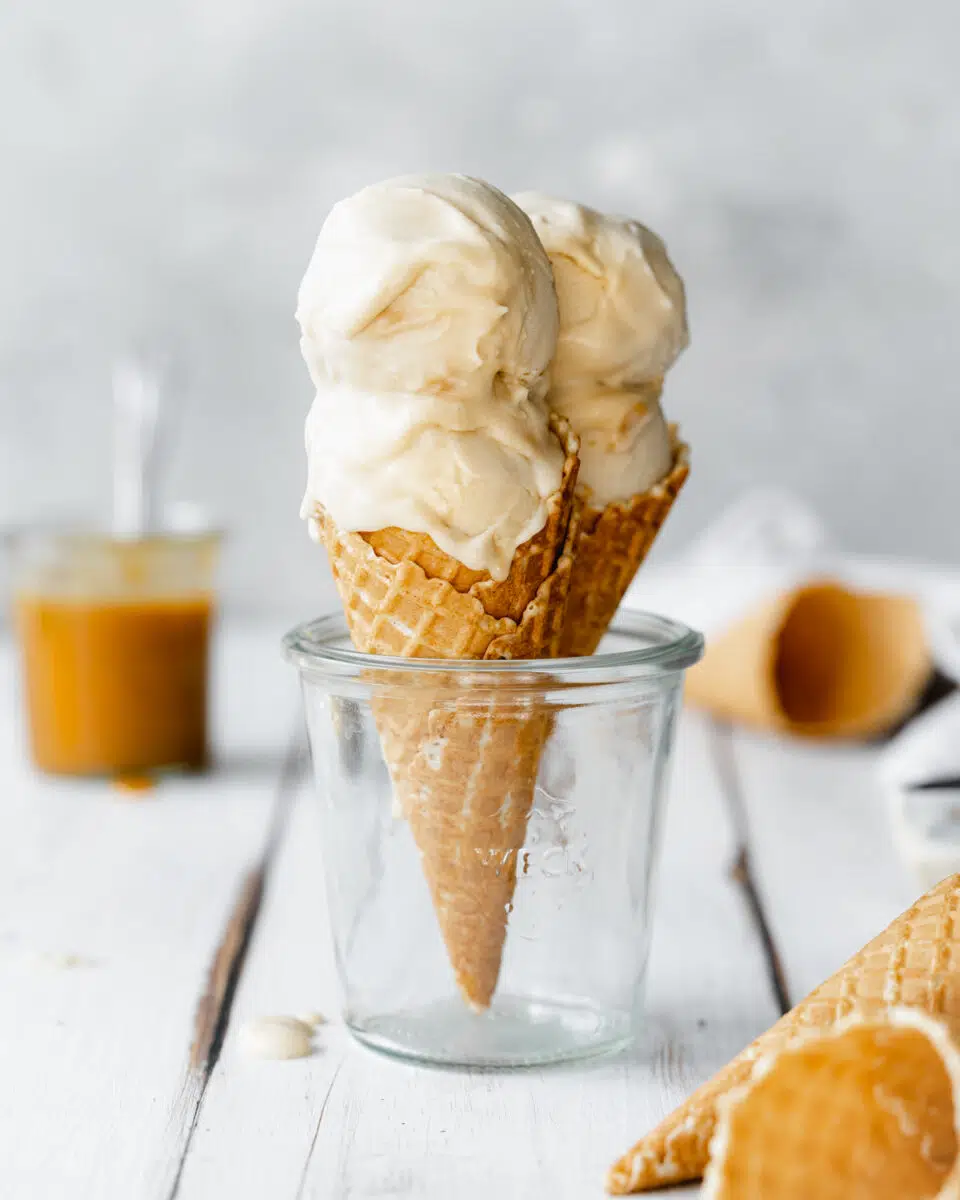
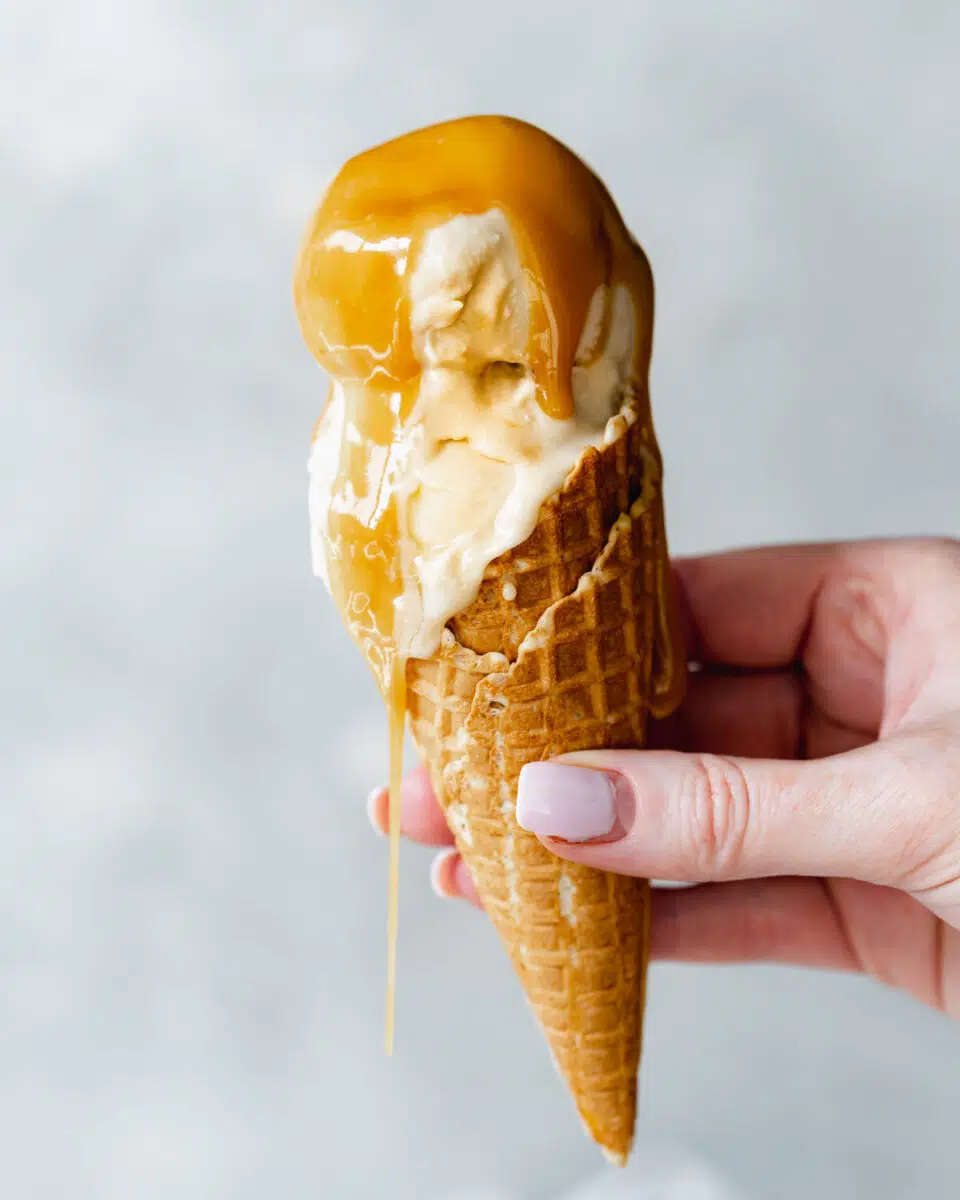
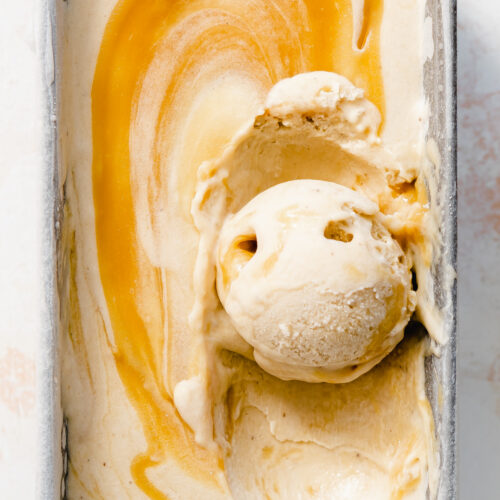
This creamy vegan salted caramel ice cream is so easy to make. It doesn't require any special equipment and has a consistency better than store-bought ice cream, without using an ice cream maker!
The incredible taste comes from homemade vegan caramel sauce which is used both to flavor the ice cream, and to drizzle over it before serving.
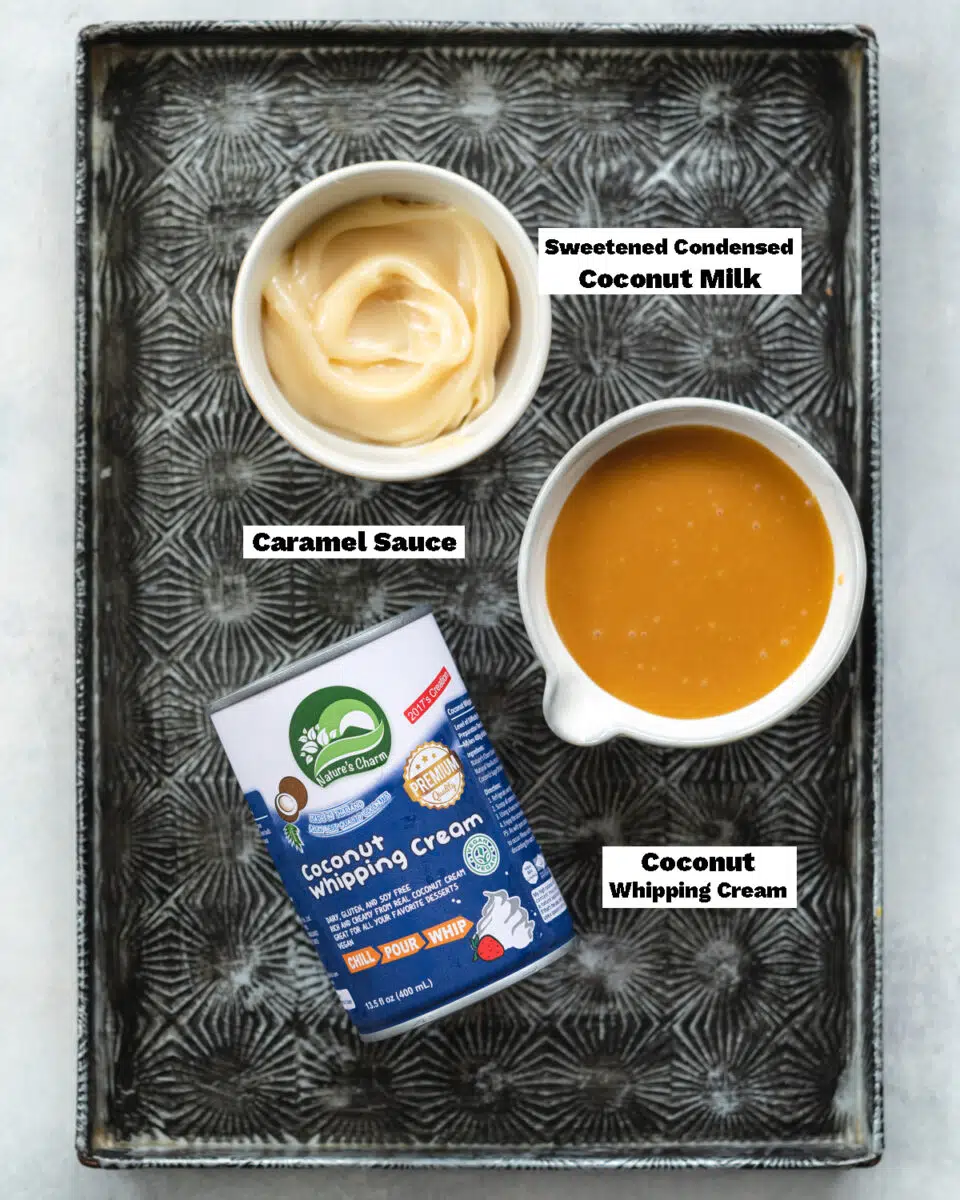
I created this recipe in collaboration with Nature's Charm Vegan Products, using their sweetened condensed coconut milk and coconut whipping cream which give the ice cream its signature creamy texture.
📖 Recipe Overview
- Easy to make with just 3 ingredients, and no ice cream maker.
- Thick creamy consistency with a sweet salted caramel flavor.
- Eggless, dairy-free, soy-free, gluten-free, and nut-free.
If you love easy vegan ice cream recipes, my passion fruit ice cream and mango ice cream recipes are both made without an ice cream machine too.
🧾 Ingredients Needed
Ingredient Notes
Sweetened condensed coconut milk is the key to creating vegan no-churn ice cream recipes. Regular condensed milk is often used for no-churn ice cream, making condensed coconut milk the perfect non-dairy alternative. You can also make vegan condensed milk at home if you can't find it where you live.
Coconut whipping cream is the base of this caramel ice cream recipe. It gives the mixture its creamy consistency and texture. This consistency often comes from heavy cream in non-vegan recipes.
And the third and last ingredient, vegan caramel sauce. This recipe has salt in it so you won't need to add any extra. Nature's charm salted caramel sauce does the trick as well.
You can also use a storebought caramel sauce without salt, then add half a teaspoon of sea salt to the ice cream as well.
🥣 How To Make Vegan Salted Caramel Ice Cream
Find the complete list of ingredients, quantities, and instructions in the recipe card at the end of this post.
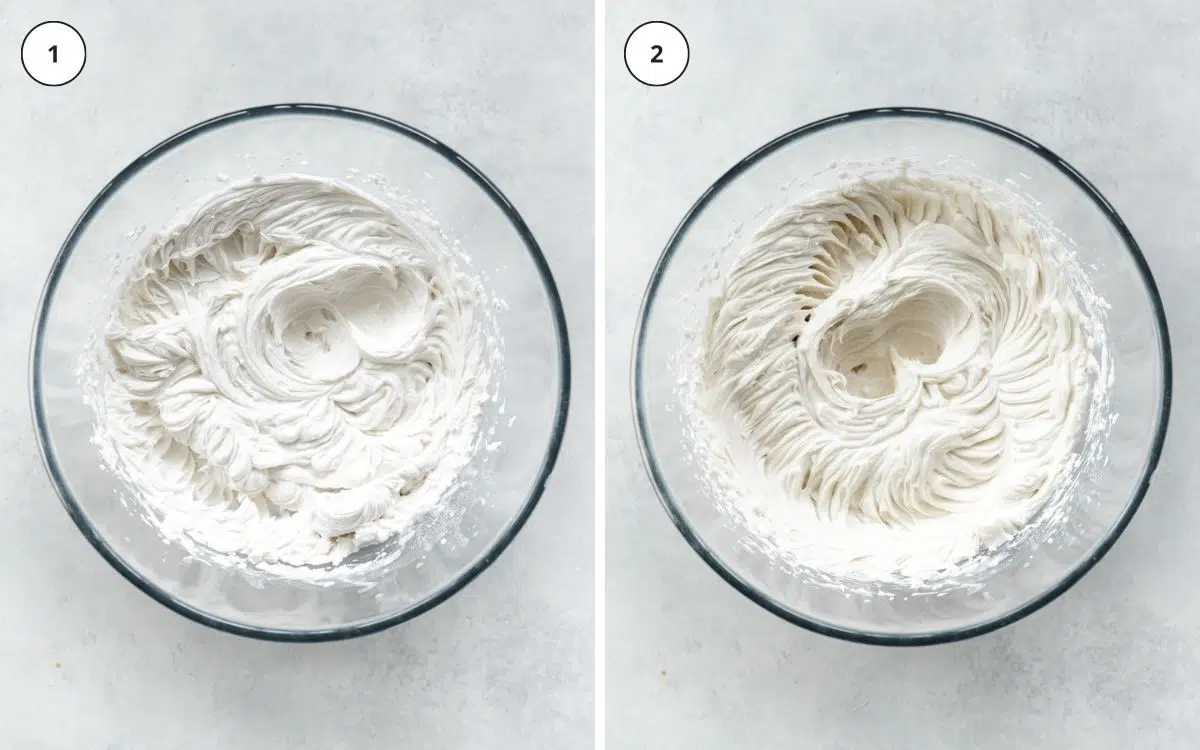
Add the coconut whipping cream to a large mixing bowl and whisk with an electric mixer for a couple of minutes. The coconut cream will whip up and become light and fluffy.
Next, add in the condensed coconut milk and whisk again for a couple of minutes until combined and you have a creamy consistency.
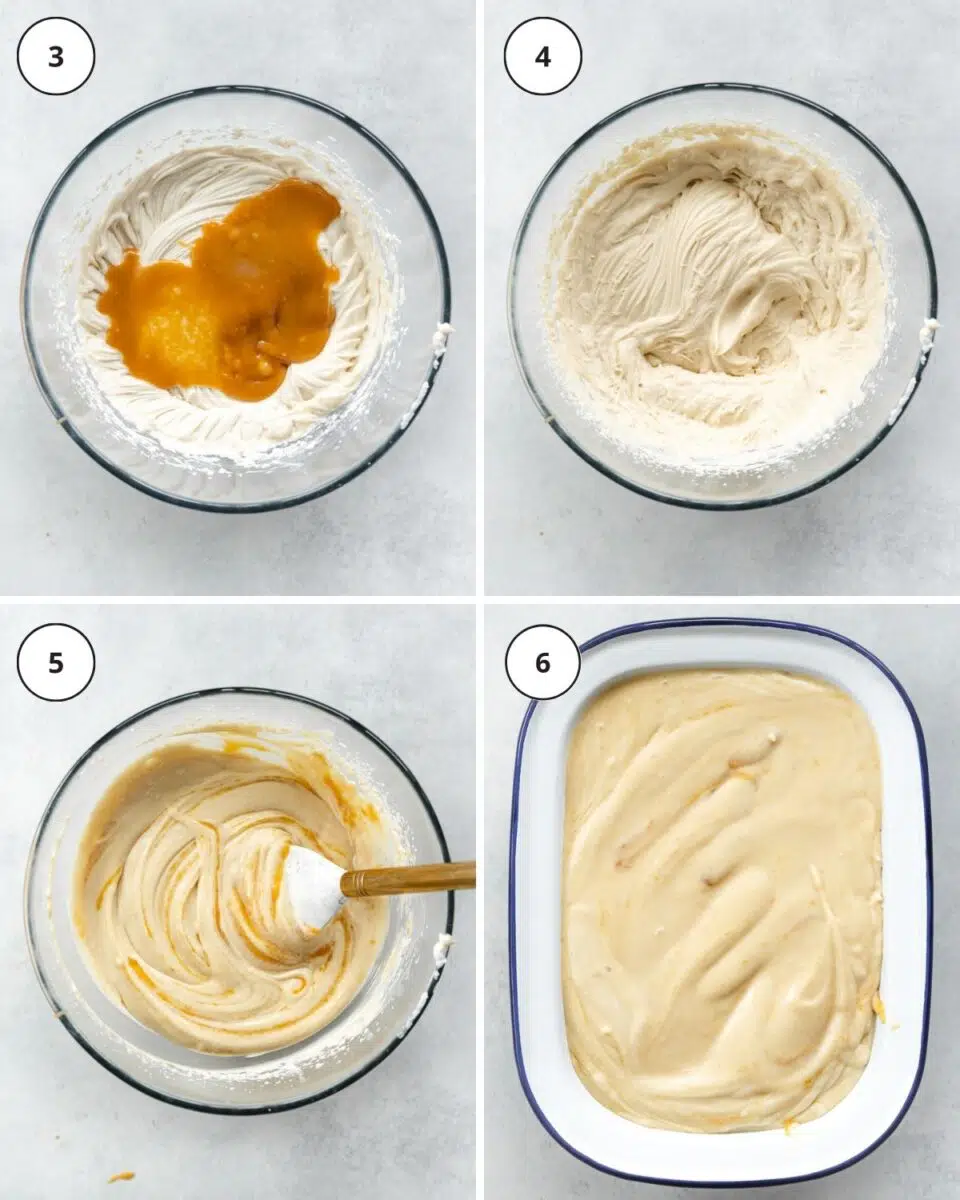
Start adding the vegan caramel sauce to the ice cream mixture in 2 to 3 increments, whisking between each one. I recommend avoiding adding all the caramel at once, as this could split the mixture if added too fast!
You can skip to freezing the ice cream at this stage, but I recommend swirling some more caramel sauce through with a spatula.
Pour the caramel ice cream into a loaf pan or plastic container and cover with a lid or some plastic wrap and freeze for 4 hours.
📝 Recipe Tips
Make sure your coconut cream or coconut milk is chilled before use. This helps it to whip up properly as it thickens the coconut milk in the tin, and separates out the liquid part from the can. You only want to use the thick cream from the top of the can, you can reserve the liquid for smoothies or even soups.
Allow the ice cream to thaw at room temperature for about 15 minutes before serving. This will ensure a creamy, scoopable consistency.
Heat your ice cream scoop before using it to create perfect scoops every time. Simply rest the scoop in a jug of hot water for a couple of minutes before serving.
❄️ Storage instructions
This vegan caramel ice cream will keep for a couple of months in an airtight container in the freezer.
💬 FAQs
Yes, you can add the ice cream mixture to your ice cream machine and churn until thick. It's possible it will take a little less time to churn than usual, seeing as the mixture is already quite thick.
If you're able to find a vegan whipping cream such as soy or oat that could work (although I haven't personally tried it). You can also use sweetened condensed oat milk in place of condensed coconut milk.
It depends on the flavor you're going for as some ingredients, in particular, berries and other fruits, have high water content. This means that oftentimes the ice cream works out better with an ice cream maker. I'd recommend trying out my vegan mango ice cream, passion fruit ice cream, or strawberry ice cream instead, as these recipes have been specifically tailored to give a creamy consistency using different fruits.
🍨 More Vegan Ice Cream

Love this recipe? Please leave a 5-star ★★★★★ rating in the recipe card below and consider leaving a comment as well, thanks!
Stay in touch with me through social media @ Instagram, Pinterest, and Facebook. And if you like one of my recipes, tag me!
Description
Ingredients
- 400 g (1 ⅔ cups) coconut whipping cream, *refrigerate overnight, see recipe notes
- 100 g (½ cup) sweetened condensed coconut milk
- 200 g (⅚ cup) vegan caramel sauce, plus extra to *see recipe notes
Instructions
- Add the coconut whipping cream to a large bowl and mix with an electric whisk for a couple of minutes until creamy. Add in the sweetened condensed coconut milk and whisk for another minute to combine.
- Add the 200g of the caramel sauce in 2-3 increments, whisking between each one to combine. Mix again with the electric whisk to fully mix the ingredients together. If desired, you can swirl some more caramel sauce through the ice cream using a spatula at this stage.
- Transfer the ice cream mixture to a loaf pan or container, and cover with a lid or plastic wrap. Freeze for a minimum of 4 hours or until set.
- Remove the ice cream from the freezer about 15 minutes before serving to allow it to thaw slightly. Serve with more vegan caramel sauce.
- Transfer the ice cream mixture to the loaf pan and cover the tin with more parchment paper so that the ice cream isn’t exposed to the air.
Storage
- This ice cream will keep for a couple of months in an airtight container in the freezer.
Notes
- Coconut whipping cream: Refrigerate the tin overnight. If using full-fat coconut milk, also refrigerate the tins overnight, then only use the thick cream from the top of the cans. Depending on the brand of coconut milk, this recipe will call the cream from 2-3 400ml cans.
- This recipe calls for about a half batch of vegan caramel sauce, but I recommend making a full batch so you have extra for serving.
- Remove the ice cream from the freezer about 15 minutes before serving to allow it to thaw slightly.
- Add boiled water to a mug or heat-proof jug and sit the ice cream scoop in it for a couple of minutes before serving.
Nutrition
© addictedtodates.com. All content and images are protected by copyright. If you want to share this recipe, please do so using the share buttons provided. Do not screenshot or republish the recipe or content in full. instead, include a link to this post for the recipe.
*This recipe was originally published on May 30th, 2020. The recipe has since been improved and was last updated on 20th April 2022 to minimize the ingredients used, simplify the instructions and make it even more delicious!
